Symple Synth: Oscillators
In this part of the tutorial we'll add a simple sine wave oscillator and make it work. Then we'll add some more possibilities.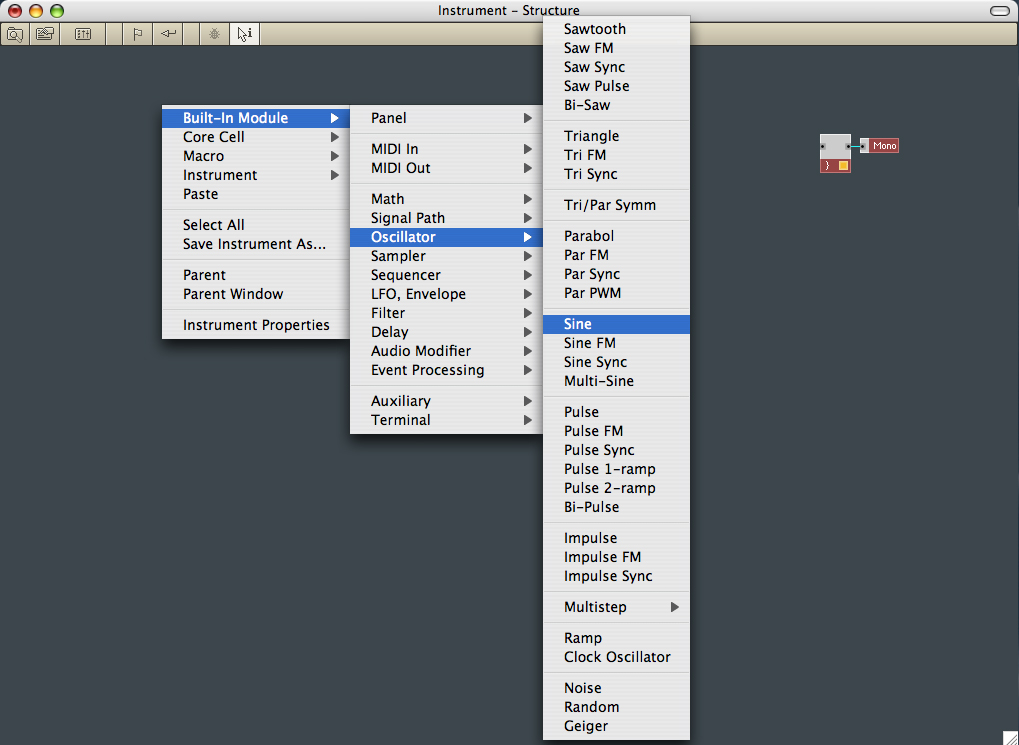
 2.
When the oscillator appears, 'wire' it into the audio collector.
2.
When the oscillator appears, 'wire' it into the audio collector.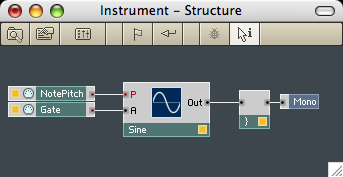 3.
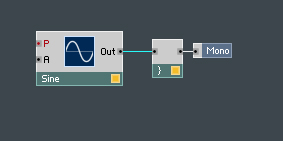
The oscillator has inputs for Pitch and Amplitude. We'll use MIDI to
control it. So Right click in the Instrument Structure again and choose
"Built-In Module>MIDI In>Note Pitch" for the Pitch
control. We'll need a Gate to start and stop the sound so, from the
same menus choose "Built-In Module>MIDI In>Gate. When
these are both wired in you should be able to use the querty keyboard
to send some MIDI note on messages and make some sounds.
3.
The oscillator has inputs for Pitch and Amplitude. We'll use MIDI to
control it. So Right click in the Instrument Structure again and choose
"Built-In Module>MIDI In>Note Pitch" for the Pitch
control. We'll need a Gate to start and stop the sound so, from the
same menus choose "Built-In Module>MIDI In>Gate. When
these are both wired in you should be able to use the querty keyboard
to send some MIDI note on messages and make some sounds.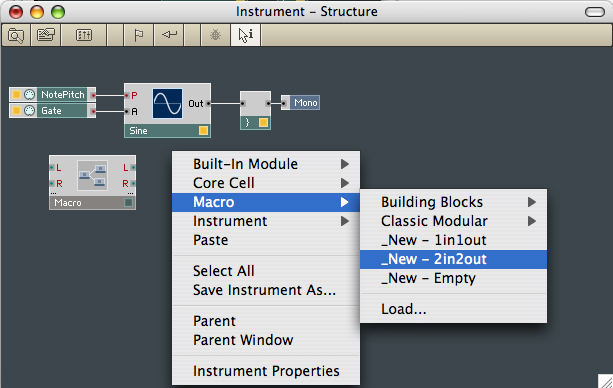 4. Next, we're going to
make our first Macro, into which we'll put our Sine wave oscillator
along with oscillators to generate Pulse, Triangle and Noise. We'll add
a switch so that we can use the Symple Synth's front panel to select
which wave to use. And we'll add a control for Pulse Width.
4. Next, we're going to
make our first Macro, into which we'll put our Sine wave oscillator
along with oscillators to generate Pulse, Triangle and Noise. We'll add
a switch so that we can use the Symple Synth's front panel to select
which wave to use. And we'll add a control for Pulse Width.
So Right click and Select Macro>_New - 2in2out
 5.
Right click the Macro and use the Properties box to rename it to
"Oscillator 1". Then Right click the Macro again and open its Structure
window. We'll only need one output, so delete one of the output ports
and rename the other to "Out". Don't close the properties box yet;
click on one of the input ports; you'll see that the properties box
changes to refer to the item you've selected. Rename the input ports to
"Pitch" and "Amp" (Amplitude won't fit).
5.
Right click the Macro and use the Properties box to rename it to
"Oscillator 1". Then Right click the Macro again and open its Structure
window. We'll only need one output, so delete one of the output ports
and rename the other to "Out". Don't close the properties box yet;
click on one of the input ports; you'll see that the properties box
changes to refer to the item you've selected. Rename the input ports to
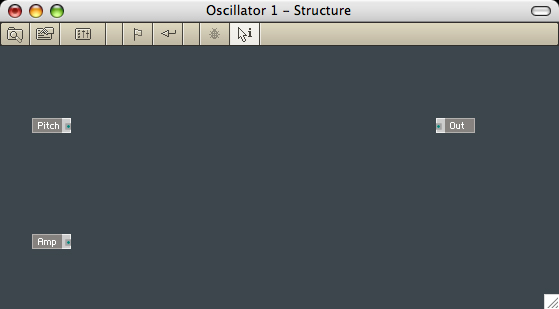
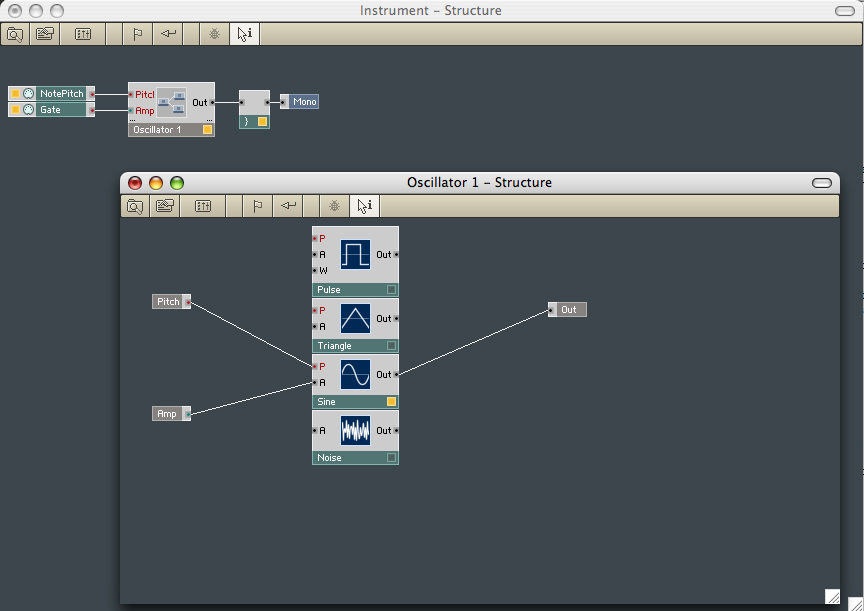
"Pitch" and "Amp" (Amplitude won't fit).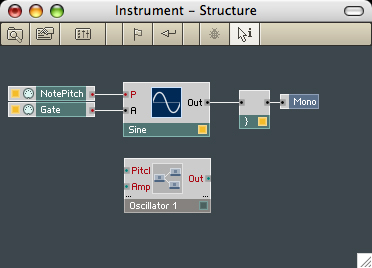 6. You may be a bit lost right now, so here's
a picture of your instrument with the new Oscillator1 Macro showing its
three ports (that's all its got so far). And it's not wired in yet.
6. You may be a bit lost right now, so here's
a picture of your instrument with the new Oscillator1 Macro showing its
three ports (that's all its got so far). And it's not wired in yet. 7.
Now we're going to move the wiring from the Sine wave oscillator to the
new Oscillator1 Macro
7.
Now we're going to move the wiring from the Sine wave oscillator to the
new Oscillator1 Macro 8. Select the Sine wave Oscillator and
Edit>Cut (surely you know the shortcut) it to the clipboard.
Open the Structure Window of Oscillator1 and Edit>Paste the Sine
wave oscillator into Oscillator1. Complete the process by wiring the
Sine wave oscillator into the Pitch and Amp inputs and the Out of the
Macro.
8. Select the Sine wave Oscillator and
Edit>Cut (surely you know the shortcut) it to the clipboard.
Open the Structure Window of Oscillator1 and Edit>Paste the Sine
wave oscillator into Oscillator1. Complete the process by wiring the
Sine wave oscillator into the Pitch and Amp inputs and the Out of the
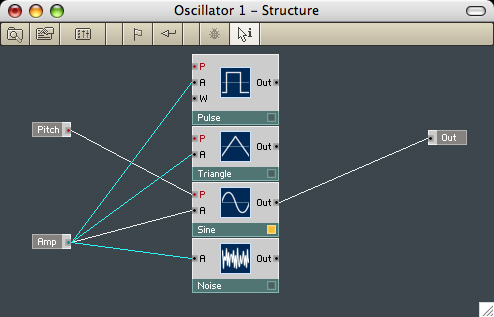
Macro. 9. The Instrument now looks like this. All of
the indicator square are yellow, so it should continue to create its
less than subtle sine wave. Incidentally, it won't start to sound good
until we add an Amplitude Envelope. But that comes later. Let's make
our Oscillator1 a bit more interesting.
9. The Instrument now looks like this. All of
the indicator square are yellow, so it should continue to create its
less than subtle sine wave. Incidentally, it won't start to sound good
until we add an Amplitude Envelope. But that comes later. Let's make
our Oscillator1 a bit more interesting.I've included a picture of the Instrument Structure here, so that you can see where you are.
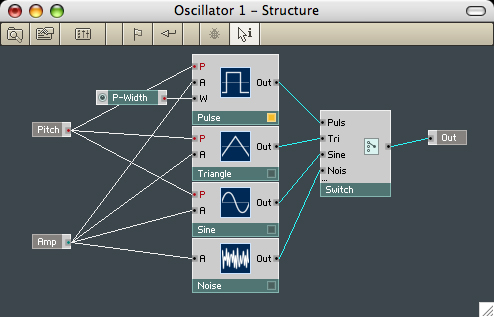
 11.
Wire the Amplitude input into the Pulse, Triangle and Noise oscillators
11.
Wire the Amplitude input into the Pulse, Triangle and Noise oscillators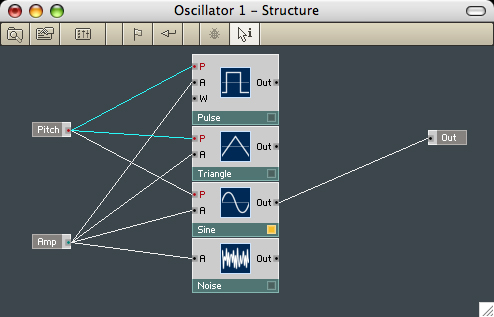 12.
Wire the Pitch input into the Pulse and Triangle oscillators (the Noise
oscillator doesn't respond to Pitch).
12.
Wire the Pitch input into the Pulse and Triangle oscillators (the Noise
oscillator doesn't respond to Pitch).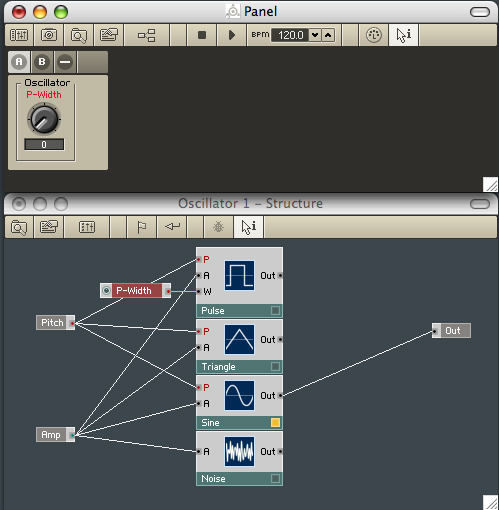 13. We'll need to
control the Pulse Width of the Pulse Wave Oscillator. Right click its W
input and select "Create Control". The P-Width control not only appears
in the Oscillator1 Structure, but also appears in the Symple Synth
front panel. Notice that if it's highlighted in the Structure Window
it's also highlighted in the Panel; that's a handy feature when you
need to find things.
13. We'll need to
control the Pulse Width of the Pulse Wave Oscillator. Right click its W
input and select "Create Control". The P-Width control not only appears
in the Oscillator1 Structure, but also appears in the Symple Synth
front panel. Notice that if it's highlighted in the Structure Window
it's also highlighted in the Panel; that's a handy feature when you
need to find things.You can select and rename the Switch's inputs (I've changed two of them in the picture).
Incidentally, look at the mess the Panel is in. We'll need to tidy that up before it gets too confusing even to see what it contains.
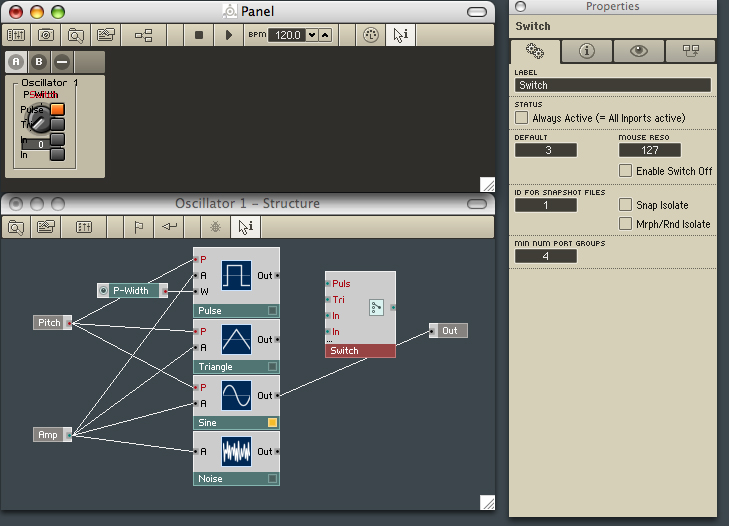
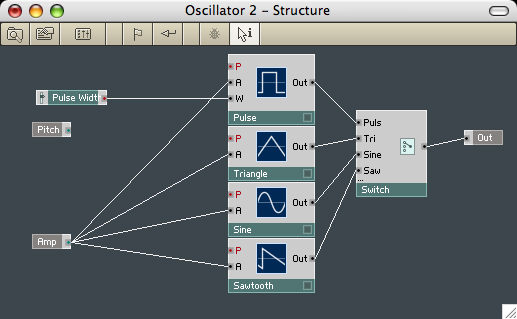
 15. Wire the outputs from all of the
oscillators to the Switch and then wire the Switch's output to
Oscillator1's output port. Whichever oscillator is selected on the
Switch Panel control (you can't even make that out properly, yet) will
have its yellow light illuminated.
15. Wire the outputs from all of the
oscillators to the Switch and then wire the Switch's output to
Oscillator1's output port. Whichever oscillator is selected on the
Switch Panel control (you can't even make that out properly, yet) will
have its yellow light illuminated.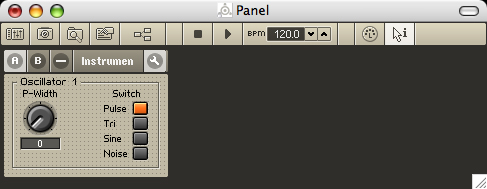 16. Unlock the Panel (Right click in the
Panel's open space if the spanner tool isn't visible yet) and drag the
Switch to the right so that it doesn't obscure the P-Width control.
Click the spanner to lock the Panel again and test the Switch. When the
Pulse oscillator is selected, you'll be able to test the Pulse Width
control, too.
16. Unlock the Panel (Right click in the
Panel's open space if the spanner tool isn't visible yet) and drag the
Switch to the right so that it doesn't obscure the P-Width control.
Click the spanner to lock the Panel again and test the Switch. When the
Pulse oscillator is selected, you'll be able to test the Pulse Width
control, too.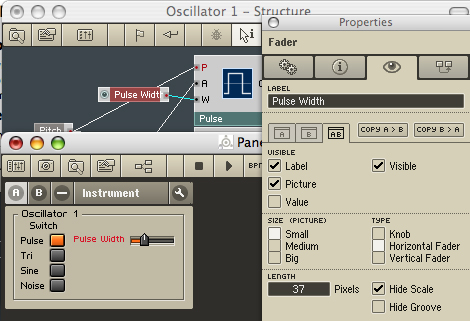 17. Right click on the
P-Width Control in the Oscillator1 Structure Window (or the P-Width
know in the Instrument Panel) and select the Eye Tab of the Properties
box. Here's where we can change it from a Big Knob to a Small
Horizontal Fader. Change its length from the default 91 pixels to 37
pixels, Hide Scale and deselect Value, and change the LABEL to "Pulse
Width", too.
17. Right click on the
P-Width Control in the Oscillator1 Structure Window (or the P-Width
know in the Instrument Panel) and select the Eye Tab of the Properties
box. Here's where we can change it from a Big Knob to a Small
Horizontal Fader. Change its length from the default 91 pixels to 37
pixels, Hide Scale and deselect Value, and change the LABEL to "Pulse
Width", too.
Unlock the Panel and tidy up by moving the Fader next to the Pulse Switch. That's our Oscillator1 Macro finished.
 18. We'll get a much
richer range of sounds if we add another, slightly different Oscillator
Macro and set up a Detune Control. That's easier to achieve than you
might think. Right click on the Oscillator1 Macro and Duplicate it.
Rename the new Oscillator "Oscillator2", open its Structure Window and
replace the Noise wave with a Sawtooth wave.
18. We'll get a much
richer range of sounds if we add another, slightly different Oscillator
Macro and set up a Detune Control. That's easier to achieve than you
might think. Right click on the Oscillator1 Macro and Duplicate it.
Rename the new Oscillator "Oscillator2", open its Structure Window and
replace the Noise wave with a Sawtooth wave.
Disconnect the Pitch wires and move things over a little. We're going to add a Detune function next.
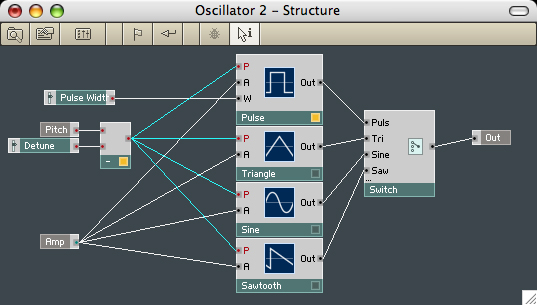 19. To Detune we'll need
to use a Subtract function, which can be found at Built-In
Module>Math>Subtract. The value to subtract will come
from a fader (Built-In Module>Panel>Fader), which we'll
label "Detune" and, using the Properties box again, adjust to a 37
pixel Small Horizontal Fader, deselect Value, select Hide Scale and
then positioned below the Pulse Width Fader in the Instrument Panel.
That's after you've moved Oscillator 2 from on top of Oscillator 1, of
course.
19. To Detune we'll need
to use a Subtract function, which can be found at Built-In
Module>Math>Subtract. The value to subtract will come
from a fader (Built-In Module>Panel>Fader), which we'll
label "Detune" and, using the Properties box again, adjust to a 37
pixel Small Horizontal Fader, deselect Value, select Hide Scale and
then positioned below the Pulse Width Fader in the Instrument Panel.
That's after you've moved Oscillator 2 from on top of Oscillator 1, of
course.
Finally, wire the output of the Subtract function into the Pitch inputs of the Oscillators. Oscillator2 is complete.
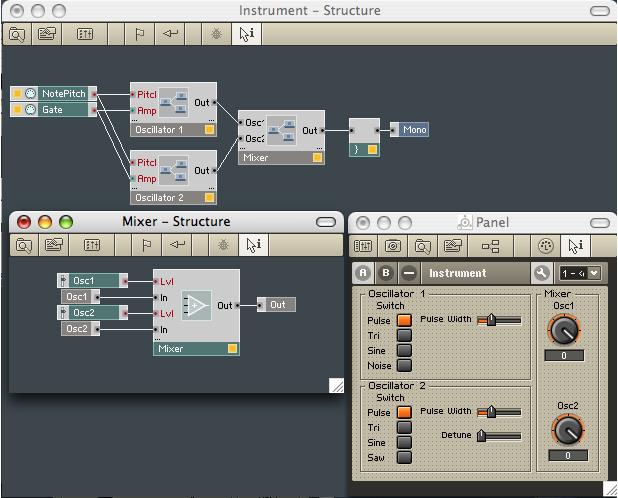 20. Back to the Instrument
Structure now and we're going to add a Mixer so that we can balance the
contributions of our two Oscillator Macros. For clarity and neatness
we'll enclose the Mixer in a simple Macro.
20. Back to the Instrument
Structure now and we're going to add a Mixer so that we can balance the
contributions of our two Oscillator Macros. For clarity and neatness
we'll enclose the Mixer in a simple Macro.
Firstly create a Macro>_New - 2in2out, delete one of the output ports and rename the other to "Out" as we did before. The two inputs can be named "Osc1" and "Osc2" and the Macro itself can be renamed "Mixer".
Into the Macro's Structure insert Built-In Module>Signal Path>Amp/Mixer and use its Properties box to change MIN NUM PORT GROUPS to 2.
Right click the Mixer's "Lvl" ports and Create Controls, which can be renamed "Osc1" and "Osc2".
The Mixer's output needs to be wired to the Mixer Macro's Out port, the two Oscillators need to be wired into the Mixer Macro and the Mixer Macro's Output needs to be directed towards the Instrument's Audio Combiner (and thence Mono Output).
Change the faders to knobs and tidy up the Instrument Panel to complete our two oscillator synthesiser. Don't worry, it will sound much better when we add an Envelope Generator to control the shape of the Volume (Amplitude).